How to Raise a Dispute for Errors in Your CIBIL Report?

Finding an error in your CIBIL report can be stressful. If this has happened to you, don’t worry — this is more common than most people think.
A loan you never took. A payment marked late even though you paid on time. A closed account still showing as active.
Most people feel stuck at this point. They know something is wrong, but they don’t know how the correction process actually works. Because of this confusion, many end up paying agents for something that can be handled independently with the right understanding.
This guide explains the entire dispute process in a practical way — from identifying the exact error, to raising the dispute correctly, to understanding what happens behind the scenes, how long it takes, and what to do if the issue is not resolved. We will go step by step exactly the way you will see it on the screen.
Why Correcting CIBIL Errors Is Important?
Your CIBIL report directly affects:
- Loan approvals
- Interest rates
- Credit card limits
- Bank verification outcomes
Even a single incorrect entry can lower your credit score or cause rejection during loan processing.
These errors do not get fixed automatically. The system only updates when you raise a dispute and the lender verifies the correction.
Common Errors People Find in Their CIBIL Report
Before you raise a dispute, you must be clear about what is wrong. Typical issues include:
- Loan account not belonging to you
- Wrong payment history marked as late
- Closed loan still reported as active
- Incorrect outstanding balance
- Duplicate loan accounts
- Incorrect personal information
- Account marked as written off even after closure
You should know exactly which account, what entry, and what the correct information should be.
First, let’s start from the very beginning.
Step 1 — Download Your Latest CIBIL Report
Always review your latest report, and remember that you can download one free CIBIL credit report each year. For step-by-step guidance, refer to our post How to Download Your Free CIBIL Report. Now go through:
- Personal details section
- Account details section
- Payment history section
Note down or screenshot the exact error you want to dispute.
Step 2 — Understand How the Dispute Process Works
This is very important.
CIBIL does not directly change your report.
What actually happens:
- You raise a dispute
- CIBIL forwards it to the lender
- The lender checks their records
- The lender responds back
- CIBIL updates the report based on that response
This means the correction depends on lender verification. Your job is to submit the dispute accurately.
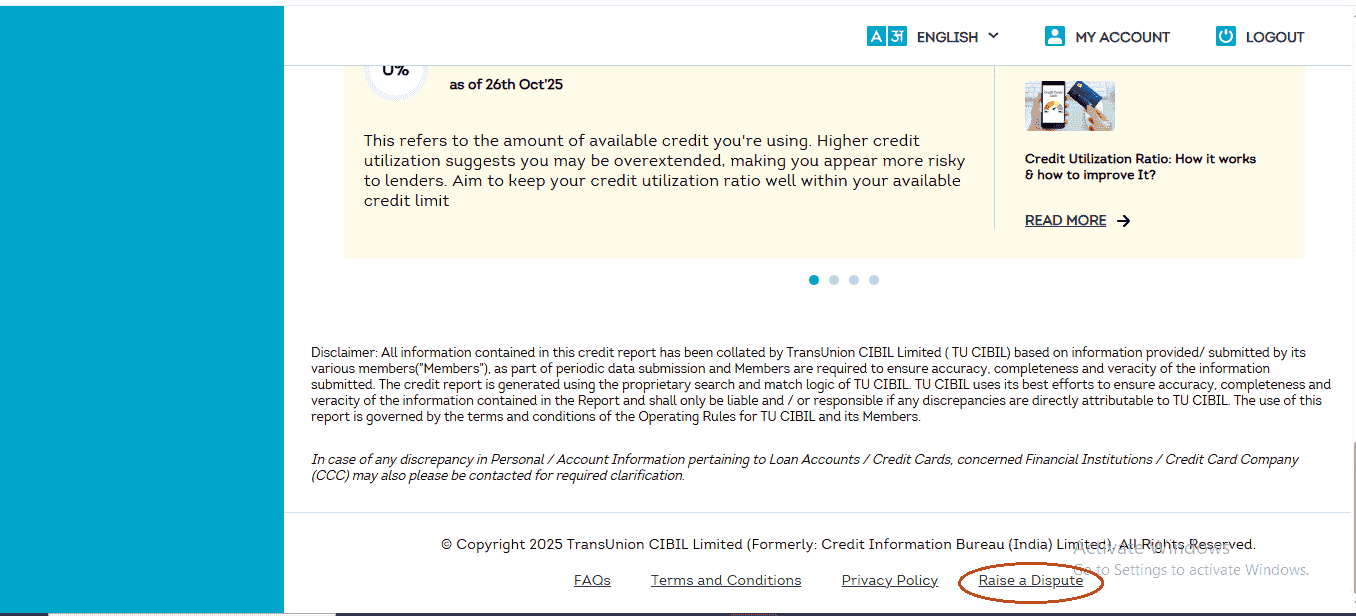
Step 3 — Finding the “Raise a Dispute” Option
Once logged into your CIBIL account and viewing your report/dashboard, you need to locate where the dispute option exists.
On the left side of your screen, you can see a menu. Look for the option that says ‘CIBIL Report’ and click on it. Now, scroll down. Keep scrolling past all the information about your score and your accounts, all the way to the very bottom of the page. Near the footer, you will see a link that says ‘Raise a Dispute’. Click on this link. It might not look very obvious at first, but you are now in the exact place where all corrections start.
Step 4 — Choosing What You Want to Fix
After you locate and click the dispute option inside your CIBIL dashboard, you are taken to the Dispute Center page.
At the top, you will see a heading:
Choose a part of your report you would like to dispute
Below this, CIBIL shows different sections where errors can exist. Understanding these sections is important because selecting the correct one helps the lender clearly understand your issue.
Here is what each section means:
-
Account Section — For mistakes related to loans and credit cards such as wrong balances, incorrect payment history, or wrong account status.
-
Personal Information — For errors in your name, date of birth, gender, or PAN.
-
Employment Information — For incorrect job or income details.
-
Credit Application History — For mistakes in your loan or card application records.
-
Contact Information — For wrong address, phone number, or email.
-
Other Information — For issues not covered above.
In most real cases, errors are usually found in:
- Account Section
- Personal Information
- Contact Information
Click the section where your error exists.
Fixing Errors in Loans & Credit Cards (Account Section)
If the issue is related to a loan or credit card, click Account Section.
A. Selecting a Problem Description
You will now see small boxes showing common issue descriptions, for example:
“Recent payment in loan account not reflecting in my CIBIL report.”
Do not worry if it doesn’t exactly match your problem.
Under each box, you will see a green button saying “Find Solution”. Click this to continue.
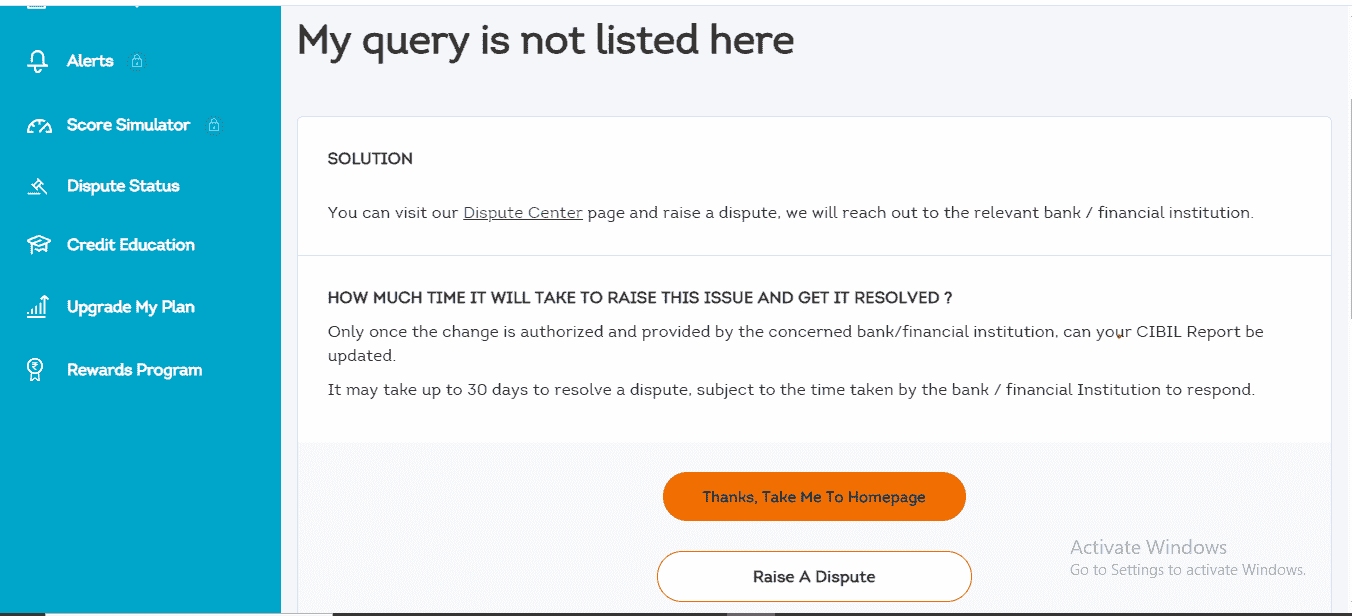
B. Finding the “Raise A Dispute” Button
You will be taken to another page with explanations. Scroll down.
At the bottom, you will see a large button:
“Raise A Dispute”
Click this button to move to the actual dispute form.
Step 5 — What You See After Clicking Raise Dispute
After selecting the dispute option, the next screen guides you to choose how to proceed.
After clicking the dispute link, you will see a screen like this which takes you to the next step of the process.
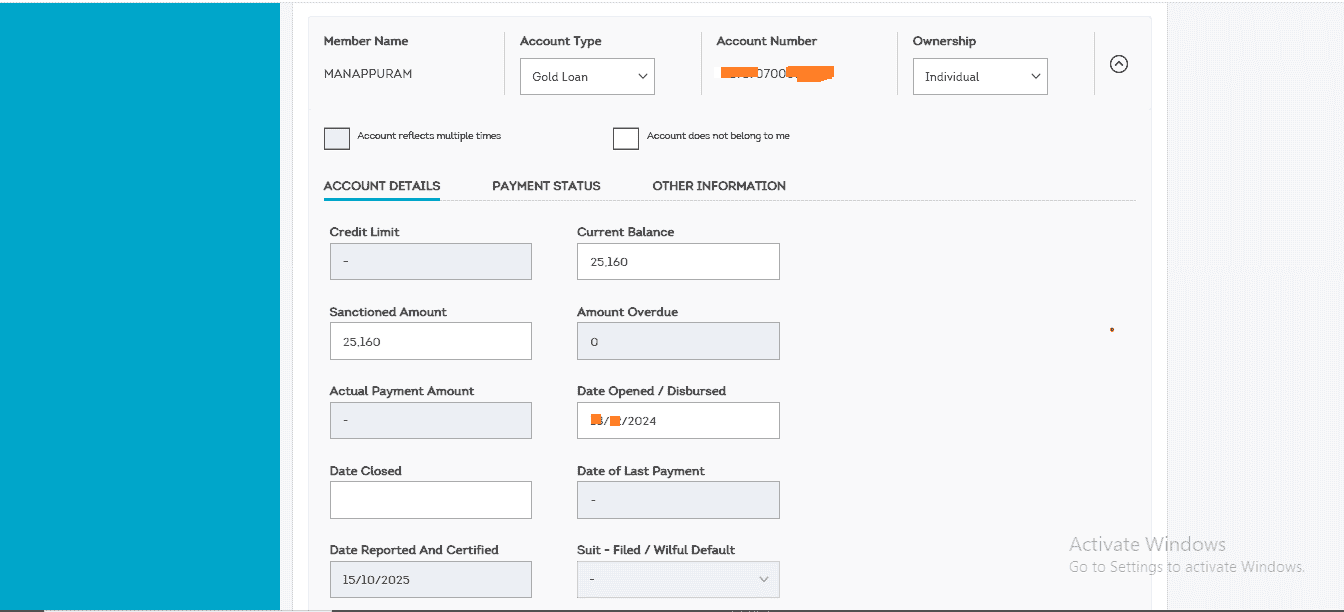
Step 6 — Identifying and Correcting Errors in Account Details
You are now on the main correction form where the actual changes are made.
This page shows a list of all the loans and credit cards recorded in your CIBIL report.
Find the account that contains the mistake.
On the right side of that account name, you will see a small arrow or a plus (+) icon. Click on it to expand and view the complete details of that account.
This is the part where you will spend most of your time during the correction.
This expanded view is where you carefully check what is wrong and start making corrections.
A. Quick Checkboxes at the Top
At the top of the expanded section, you will see two important checkboxes:
-
Account reflects multiple times — Select this if the same loan appears more than once.
-
Account does not belong to me — Select this if this loan or credit card is not yours.
If your issue matches either of these, simply check the box. No further editing is needed for this account.
B. Correcting Details in the “Account Details” Section
Scroll down to the section titled ACCOUNT DETAILS.
Here you will see editable fields such as:
- Current Balance
- Amount Overdue
- Date Closed
- Credit Facility Status
If any value is incorrect, click directly on that field. A small input box will appear where you can type the correct value.
For example:
If the status shows Settled but you fully repaid the loan, change it to Clear Existing Status. This tells the system to remove the “Settled” remark from your record.
C. Fixing Errors in Payment History (Very Important)
Next to the Account Details tab, you will see another tab called PAYMENT STATUS.
Click on it.
This section shows your payment history month by month using codes:
- 000 — Paid on time
- 030 — 30 days late
- 060 — 60 days late
- SMA — Special Mention Account
- DBT — Doubtful
If a month is incorrectly marked late, click on that code and change it to 000. You can correct multiple months if required.
D. Checking the “Other Information” Tab
There is also a tab called OTHER INFORMATION.
This section usually contains details if a loan was written off or reported under special conditions. If your issue relates to this, you can edit those fields as well.
E. Continue After Making Corrections
After correcting the errors for this account, scroll to the bottom and click the Continue button. If you have multiple accounts with issues, repeat the same steps for each before clicking Continue.
F. Review & Submit Dispute Page
After clicking Continue, a page titled Review & Submit Dispute will open.
This page shows a summary of all the corrections you made.
Read everything carefully. If all details are correct, click Proceed to next step to move toward final submission.
Step 7 — The Final and Most Important Step (RBI Identification & Bank Details)
No matter which type of mistake you corrected — whether it was in Account Details, Personal Information, or Contact Information — you will now reach a common page titled:
Update Your Account Information
This step often surprises users, but it is an important part of the process.
This step is mandatory for everyone raising a dispute. This requirement is based on guidelines meant to protect consumers. The purpose is simple: If, in the future, a bank is instructed to provide compensation due to incorrect reporting or delays, this is how the amount can be transferred securely to you.
You must fill this form very carefully.
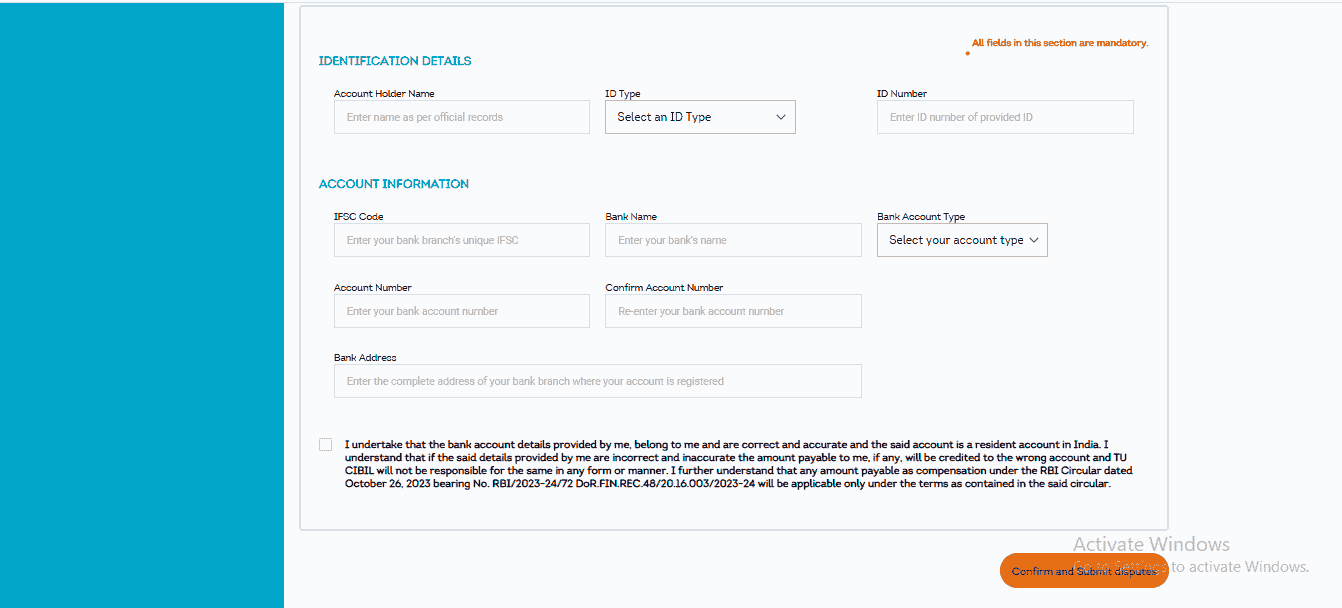
A. Identification Details
In the IDENTIFICATION DETAILS section:
- Enter your full name
- Select your ID type (such as Aadhaar)
- Enter the ID number correctly
B. Account Information
In the ACCOUNT INFORMATION section, enter:
- Your bank’s IFSC code
- Bank name
- Account type (Savings or Current)
- Your bank account number (you must enter it twice to confirm)
- Your bank branch address
Double-check your IFSC code and account number. These must be accurate.
C. Confirm and Submit
After filling everything, click:
Confirm and Submit Disputes
You will now see a confirmation screen.
On this screen, a Dispute ID will be generated. It will look similar to:
CDS12345678910
This number is extremely important.
Take a screenshot, note it down, or save it somewhere safe. You will need this ID to track your dispute status later.
Congratulations — your dispute is now officially submitted.
Step 8 — What Happens After You Submit the Dispute
After you click Confirm and Submit Disputes and receive your Dispute ID, your role in the process is mostly complete.
From this point onward, the action shifts behind the scenes between CIBIL and the bank or financial institution that reported the information.
Here is what happens next.
CIBIL Forwards Your Dispute to the Lender
CIBIL does not directly edit any data in your report.
Your dispute is forwarded to the exact bank, NBFC, or credit card company that originally reported the entry you corrected.
They are the only ones who can confirm whether the data should be changed.
The Bank Reviews Your Case
The lender is given up to 30 days to:
- Check their internal records
- Review the corrections you submitted
- Send a response back to CIBIL
This review period is standard and applies to all disputes.
The Three Possible Outcomes
After the review, one of three things will happen.
A.The Bank Agrees With Your Correction
If the bank confirms that the earlier data was incorrect:
- They send the corrected information to CIBIL
- CIBIL updates your credit report
- You receive an email or SMS confirming resolution
B. The Bank Disagrees
If the bank checks and confirms that their original data is correct:
- No change is made to your report
- The dispute is marked as closed
- A reason is recorded for rejection
At this point, you may need to contact the bank directly with documentary proof.
C. The Bank Does Not Respond Within 30 Days
If the lender fails to respond within the allowed time:
- The disputed entry may be temporarily removed from your report
- It remains removed until the lender can justify and re-report it correctly
This rule exists to protect consumers from delays.
Always Verify the Update Yourself
Once you receive a resolution message:
- Log back into your CIBIL account
- Download a fresh copy of your report
- Go to the exact section you disputed
- Confirm that the change is visible
Never assume it is fixed without checking.
Important Tips for a Smooth Experience
- Be patient — The full process can take up to 30 days.
- It is always free — Raising a dispute on the official CIBIL website does not cost anything.
- Check your report once a year — Early detection of errors prevents future problems.
- If the bank rejects your dispute — You can contact the bank’s customer care or grievance officer with proof. If needed, you can escalate the matter to the RBI Ombudsman for further review.
Conclusion — Taking Control of Your Credit Record
Once you go through this process once, you will never feel confused about it again.
Your credit report is a reflection of your financial behavior. When incorrect information stays there, it does not just affect your score — it affects how banks see you. By following the steps in this guide, you are not relying on agents or paying unnecessary fees. You are understanding the system and using the correct process to fix what is wrong.
This is not just about disputing an entry. It is about making sure that when any bank checks your report, they see the accurate and trustworthy picture of your credit history.
And once you know how this process works, you can repeat it confidently whenever needed.
0 Comments
No comments yet. Be the first to share your thoughts!